Here was the original problem:
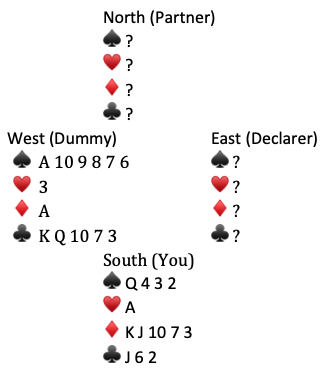
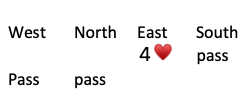
On the first trick: you (South) lead 2♠️, Dummy plays the 6♠️, partner follows with 5♠️, and declarer wins with the J♠️.
On trick two: declarer (East) leads 2♦️ to Dummy’s A♦️ (you and partner contribute small ♦️s).
At trick three: Dummy leads 3♥️, partner plays 8♥️, East plays K♥️, and you win with A♥️.
What do you lead to trick four?
Solution–
South and dummy started with ten ♠️s. The only ♠️s left for partner and declarer are the K J 5♠️. The 5♠️ and the J♠️ were played on the first trick. So who has the K♠️?
If partner started with K 5 in ♠️s would he/she play the 5♠️ on the first trick?—NO. If declarer started with singleton J♠️ would she/he play small in dummy on the first trick—NO. Our conclusion is that North (Partner) started with a singleton 5♠️ and Declarer started with K J ♠️. Partner is out of ♠️s– so we lead a ♠️ to give him/her a ruff.
Here was the entire deal:
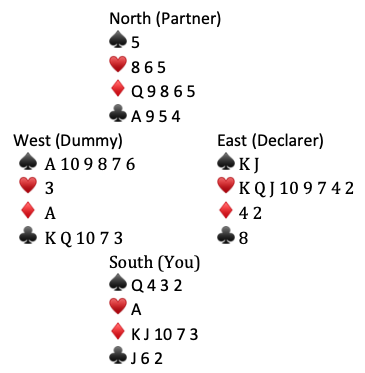
If South leads a ♠️ at trick four, the defense will get a ♥️ trick, a ♣️ trick, a ♦️ trick, and a ♠️ ruff. Contract down one. Four ♥️s made at the other table. This would have been a 10 IMP swing.
Unfortunately, South cashed K♦️ and then tried J♦️. Declarer ruffed, drew trumps, and conceded a ♣️. East made her 4♥️ contract.
[For more bridge quizzes click on Bridge Index page.]

