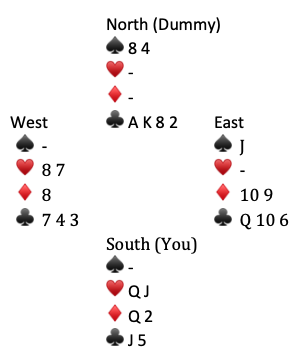
Here is the original problem:
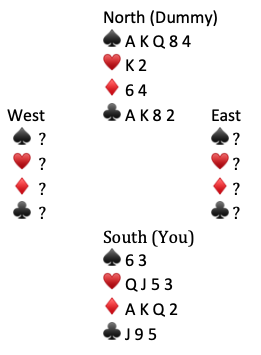
West leads the 9♥️. Dummy plays small and East wins A ♥️. At trick two East leads J♦️ to your A♦️. Count your top winners—three in ♠️s, three in ♥️s, three in ♦️s, and two in ♣️s—one short of making your 6 NT contract. With eleven tricks to go you have ten winners and one loser—that’s squeeze time!
In a squeeze, “threat cards” are cards that might turn into winners if the defense does not keep that suit. We say the defense needs to “protect” that suit.
Some double squeeze notes:
i. Sometimes only one defender can protect a suit.
ii. When you have multiple squeezes going on, the suit that both defenders are protecting should be saved for last.
iii. When executing a squeeze, one needs to be mindful of when/if a threat card has become good.
iv. You will not need to keep track of the last suit you intend to play, only the previous threat cards.
v. Another consideration is entries—you will need to assure access to any threat cards that become winners.
vi. Finally, you will need to be careful not to squeeze yourself before squeezing the opponents.
It sounds more complicated than it really is.
For the hand above, answer the following:
1. What are your threat cards?
2. Which suit could both defenders protect?
3. Which threat cards will you need to watch carefully?
4. What order should you play your suits? (Remember to unblock the ♥️s)
Quiz answers–
1. What are your threat cards?
8♠️, 8♣️, and 2♦️
2. Which suit could both defenders protect?
To protect ♠️s or ♦️s a defender would need to have four cards in that suit. So only one defender can protect ♠️s and one can protect ♦️s. Both defenders might protect ♣️s.
3. Which threat cards will you need to watch carefully?
8♠️ and 2♦️. The ♣️s will be the last suit to play so no need to watch ♣️s.
4. What order should you play your suits?
The suit that both defenders might protect, ♣️s, will be last. Since you only have one entry back to your hand (6♦️), you will need to try the ♠️ suit before going to your hand. Otherwise when you run the ♥️s you will not know if the 8♠️ has become a winner. The correct order is ♠️ winners, K♥️ (unblocking the ♥️s), then 6♦️ to your hand, and cashing all the red suit winners.
How the attempted double squeeze turned out—
When North cashed the ♠️ winners, West showed out on the third ♠️. This was disappointing because now for the ♠️/♣️ part of the double squeeze, Dummy (North) will be squeezed before East. Buck up and continue on with the squeeze, good things might happen.
Here was the entire deal:
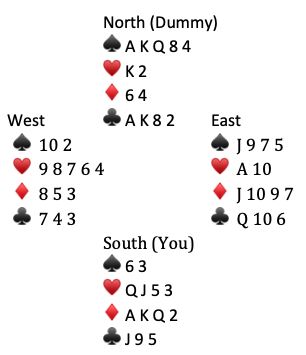
As it turned out West could protect neither ♣️s nor ♦️s. So East was caught trying to protect ♣️s, ♦️s, and ♠️s!
Here is what East was faced with when South is ready to play Q♥️:
South led Q♥️ and Dummy discarded a low black card. East was stuck. No matter which card East played it gave declarer the extra trick he/she needed.
The moral of the story is—play for the squeeze and good things can happen.
Post Mortem: East could have defeated the contract by playing the 10♥️ on trick one. Partner’s lead of the 9♥️ marks declarer for Q J ♥️ so East should duck and wait to capture North’s K♥️ with the A♥️. North/South now only get two ♥️ winners not three. East still gets squeezed out of his/her ♦️s but the subsequent ♣️/♠️ squeeze fails.
[For more bridge quizzes click on Bridge Index page.]