
Here was the original problem:

Trick 1: K♣️(North), A♣️, 4♣️, 3♣️
Trick 2: 3♦️(East), 2♦️, K♦️, 4♦️
Trick 3: Q♦️(West), 5♦️, 10♦️, 6♦️
Trick 4: Q♠️(West), 2♠️, 4♠️, A♠️ (You)
Trick 5: Attacking lead, hoping to find partner with A♥️?
or a Passive lead? i.e. ♦️ or trump
Solution–
Let’s start by counting points. Dummy has 11, you have 8, and declarer has 16 ±1. That totals to 35±1. The entire deck has 40 high card points so partner has 5±1. Partner’s lead of the K♣️ at trick one marks him/her for ♣️K Q. From this we conclude that partner cannot have the A♥️. Leading a ♥️ from the south hand (active defense) will give away a trick to the Q♥️. Best defense on this hand is a passive one. South should lead a ♦️ or a ♠️ to trick five.
Here was the entire deal:
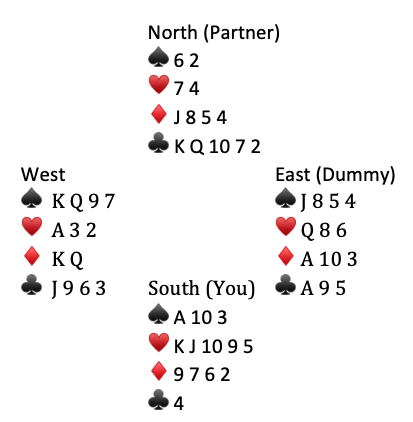
On a passive defense North/South can expect to win one ♥️, two ♣️s, and a trump–defeating the contract. When this hand was played South lead a ♥️ at trick five. Declarer let it run to the Q♥️. Then he cashed A♦️ discarding the remaining small ♥️ in his hand. The defense ended up taking only A♠️ and two ♣️s–contract making.
When the opponents open with a NT bid you should always take the time to determine the strength of partner’s hand.
[For more bridge quizzes click on Bridge Index page.]