
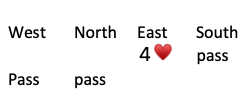
East deals, North/South vulnerable, IMP scoring
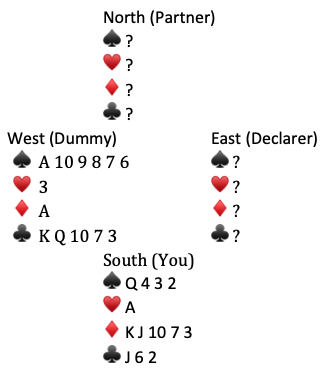
On the first trick: you (South) lead 2♠️, Dummy plays the 6♠️, partner follows with 5♠️, and declarer wins with the J♠️.
On trick two: declarer (East) leads 2♦️ to Dummy’s A♦️ (you and partner contribute small ♦️s).
At trick three: Dummy leads 3♥️, partner plays 8♥️, East plays K♥️, and you win with A♥️.
What do you lead to trick four?
Since I would’ve never led from the spade suit, I’ll just answer the question. You are marked with the queen and your right hand upon is marked with the king. I guess my question back to you is why lead a spade and not the jack of diamonds
The question is “What do you lead to trick four?”
East started with KJ of spades, and North had the stiff 5. You need to lead the spade Q, a high spade to signal a diamond return after partner’s expected spade ruff. You hope to win 2 diamonds to set the contract. If you don’t attack diamonds now, your diamonds will disappear on dummy’s spades and/or clubs.